You’ll get a compact MPPT DC-to-battery adapter that lets you recharge DJI Power 500/1000/1000 V2/2000 packs from 12–30 V solar arrays while enforcing per-channel 10 A limits and combined 20 A caps. It’s built for field use with a metal heat-dissipation bracket, clear wiring and mounting guidance, and compatibility notes for non-official panels (<30 V OC). Expect reliable topping-up, thermal protection, and defined power ceilings; keep going and you’ll find setup, tests, and trade-offs.
Some Key Takeaways
- Provides reliable MPPT charging for DJI Power 500/1000/1000 V2/2000 batteries with clear per-channel current and power limits.
- Input accepts 12–30 V DC; non-official panels must have open-circuit voltage under 30 V.
- Per-channel max 10 A and 200 W, combined channel limit 20 A (total depends on battery model).
- Includes metal heat-dissipation bracket for outdoor use; test for thermal throttling under real sun and loads.
- Best for field/off-grid DJI workflows with certified panels; limited by voltage cap, temperature range, and channel power ceilings.
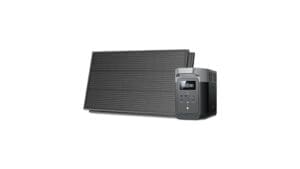
What the DJI Power Solar Panel Adapter Module (MPPT) Is and Who Should Buy It
Think of the DJI Power Solar Panel Adapter Module (MPPT) as a purpose-built DC-to-battery interface that lets you recharge DJI Power series portable batteries from solar panels while managing voltage and current within safe limits. You’ll use it to convert panel output into regulated charging for field deployments, prioritizing solar portability and consistent recharge behavior. If you operate drones, cameras, or remote systems off-grid and value neat outdoor aesthetics, this module fits. You’ll appreciate its pragmatic design, included heat-dissipation hardware, and clear installation steps. Buy it if you need reliable, eco-friendly recharging that integrates with the DJI Power ecosystem. Portable solar panels designed for backup generators often prioritize high-efficiency cells to maximize power in compact, lightweight packages.
Compatibility, Power Limits, and Electrical Requirements (Voltage, Current, Panel Specs)
Having introduced what the MPPT module does and who it’s for, let’s examine exactly what solar panels and power limits it expects so you can size and connect systems safely. You’ll find clear solar compatibility: it pairs with DJI Power 500/1000/1000 V2/2000 and DJI-certified Zignes panels; non-official panels must have open-circuit voltage under 30 V. Input limitations are 12–30 V DC, max 10 A per channel, 20 A combined. Per-channel power caps are 200 W; total depends on battery: up to 400 W with Power 1000 (300 W with Power 500). Respect these limits to avoid damage and guarantee reliable charging. This advice is aimed at users shopping for portable power and backup solutions, including those browsing portable solar generator gear to outfit their systems.
Step-by-Step Setup and Installation Tips (Bracket, Screws, Solar Panels, Safety)
Before you connect panels, mount the included metal heat-dissipation bracket to the MPPT module using the provided screws and ball-end hex key so the module can shed heat during operation. Check bracket alignment visually and with the bracket’s locating tabs. Choose 10 mm or 20 mm screws per chassis thickness and tighten using controlled screw torque—don’t overtighten. Position panels for ideal panel placement and secure connectors; confirm open-circuit voltage remains under 30 V for non-official panels. Route cables neatly: plan wire routing to avoid sharp edges and strain. Inspect fasteners, vents, and connections before first use; follow safety spacing and grounding. Portable solar gear for portable power requires proper panel orientation and secure mounting to ensure reliable performance and safety portable power.
Real-World Performance: Charging Tests, Temperature Limits, and Efficiency Notes
When you run charging tests on the DJI Solar Panel Adapter, measure input voltage, current, and module temperature under realistic sun angles and panel loads to verify it stays within the 12–30 V and 10 A/20 A channel limits; you’ll want to log peak power, sustained output, and any thermal rise to confirm the MPPT’s cooling bracket and rating are sufficient. You should test across clear and cloudy conditions to capture weather variability effects on MPPT tracking and output. Track charge curves to detect inefficiencies or charge tapering that could accelerate battery degradation. Report steady-state efficiency, thermal throttling points, and recommended derating. Also consider matching the panel and controller specs to your system needs using a suitable solar charge controller.
Pros, Cons, and Final Buying Recommendation (Best Use Cases and Alternatives)
After validating performance metrics like input voltage, current limits, and thermal behavior in real-world charging tests, weigh the DJI Solar Panel Adapter’s strengths and weaknesses against your operational needs. You’ll gain reliable MPPT charging, clear current caps (single 10 A, triple 20 A), and compact thermal hardware that helps protect battery lifespan. It’s limited by max voltage (<30 V for non-official panels), operating range (-10° to 45° C), and channel power ceilings (200 W/channel). Best use cases: field ops with DJI Power series and certified panels, eco-conscious workflows. Alternatives: larger third-party MPPTs if you need higher output or broader weather resistance. Consider pairing with RV solar panels sized for your campsite or backup generator setup to maximize portability and runtime.
Some Questions Answered
Can It Charge Batteries While the Drone Is Connected and Powered On?
Yes — you can charge batteries while the drone is connected and powered on, provided you respect charging compatibility and simultaneous operation limits. You’ll need to guarantee input voltage stays between 12–30 V, channel current doesn’t exceed 10 A (or 20 A for triple), and total power doesn’t surpass the module’s per-channel and total wattage caps. Follow installation and safety steps so everyone can use it confidently and reliably.
Does the Module Support Firmware Updates or Diagnostics?
Yes—you can expect firmware diagnostics and update support to be handled through DJI’s ecosystem. You’ll connect the module to a compatible DJI Power unit and use the DJI app or desktop tool to check firmware versions, run diagnostics, and apply updates when available. Follow prompts for safe updating, make certain stable power and proper panel connections, and install the heat-dissipation bracket. This keeps the module reliable and integrated with your DJI setup.
Can Multiple Adapter Modules Be Daisy-Chained for Higher Power?
Yes — you can use parallel operation and load sharing by connecting multiple adapter modules to increase available input power, but you’ll need to respect each module’s limits. You’ll connect modules to separate solar channel inputs and make certain total panel output doesn’t exceed per-channel and total caps (200 W/channel, 400 W or 300 W overall depending on battery). Install heat brackets and monitor currents so your group operates safely and reliably.
Is There an Ip/Water Resistance Rating for Outdoor Use?
No, there’s no specified IP rating or formal water resistance listed, so you shouldn’t assume outdoor waterproofing. You’ll want to protect the module from direct rain and prolonged moisture, and safeguard UV protection for exposed cabling and the metal bracket. Treat installation as semi-sheltered: use weatherproof enclosures or covers, seal connectors, and mount where sunlight and airflow balance heat dissipation with shelter to maintain reliability and safety.
Are There LED Indicators for Charge Status and Fault Alerts?
Yes — you’ll see LED indicators that report charging status and fault alerts. The LEDs provide clear states for input connection, charging activity, and error conditions so you can monitor performance at a glance. You’ll use them to confirm proper solar input, detect overcurrent or voltage faults, and respond quickly. The indicators are practical, technically informative, and help you feel confident and included when troubleshooting or optimizing your setup.