You’ll get a lightweight solar electric fence charger that claims a 10-mile range but delivers about 0.16 joule output, suitable for small-to-medium livestock and temporary grazing. It uses built-in panels and a GEL battery you’ll hook up manually (red to +, black to −), and it can sustain 24-hour protection with good sun and minimal line leakage. Expect reduced performance in prolonged overcast; check pulse under load. Keep going to see installation, maintenance, and suitability details. 24 hour solar fence charger benefits include its energy efficiency and low maintenance requirements. Many users appreciate the ability to provide constant power without relying on traditional electricity sources. Additionally, it offers an environmentally friendly solution for those looking to keep their livestock secure.
Some Key Takeaways
- Claims 10-mile range are theoretical; real effective reach depends on wire quality, grounding, and line leakage.
- 0.16-joule output suits small-to-medium livestock and temporary strip-grazing, not heavy-duty perimeters.
- Built-in solar panel plus GEL battery provides around-24-hour protection and up-to-28-day runtime in light-reduced conditions.
- Manual battery hookup and adjustable 360° panel mount enable portable, communal farm use but require correct installation.
- Monitor voltage/pulse under load, clear vegetation, and consider supplemental charging or regulators for reliable performance.
Quick Verdict : Performance, Battery Life, and Who It’s Best For
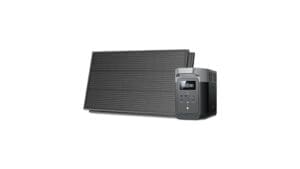
Evaluating the 10 Miles Solar Electric Fence Charger, you’ll find a compact, technically sound unit that reliably energizes up to 10 miles of fencing with a 0.16-joule output, making it suitable for containing small to medium livestock in strip-grazing or temporary setups. You’ll appreciate its steady 24-hour protection, GEL battery and solar panels tuned for low-light charge retention, and straightforward battery-connector safety step. Its portable build and solar aesthetics fit communal farm settings, and installation on a T-post is simple. You’ll value predictable performance, clear maintenance steps, and user safety features that support confident, shared use. It also pairs well with portable power stations commonly used for backup and off-grid setups.
Key Specs That Matter: Range, 0.16 J Output, Solar Battery and Setup
Because you need predictable performance across different setups, start by focusing on three measurable specs: the 10-mile range, the 0.16-joule output, and the solar/GEL battery system and its user hookup. You’ll plan layouts knowing the unit targets up to 10 miles, but wire quality and grounding affect effective reach. The 0.16 J output is low-power for temporary grazing; you’ll monitor output consistency under load. The built-in solar plus internal GEL battery requires you to connect red to + and black to −; that step is vital for battery safety. Mounting and orientation complete reliable, community-minded deployment. For accessory compatibility and portability, consider portable solar generator options that complement fence charger setups.
Real-World Performance: 24/7 Protection, 28-Day Runtime Claim, and Low-Light Behavior
Typically, you’ll get continuous, 24/7 protection when the charger is installed and oriented correctly. You’ll monitor voltage and pulse consistency to verify 0.16 J output across your fence; that practical check predicts real-world uptime. The system’s battery longevity depends on charge cycles, load from fence wiring, and panel exposure. In low-light stretches the charger prioritizes charge to the internal GEL acid battery, sustaining nighttime performance for livestock containment. Expect the claimed up-to-28-day run only under light-reduced but not fully overcast conditions and with minimal leakage on the line. You’ll troubleshoot grounding and vegetation to maintain reliable operation. Consider selecting a charger with an appropriate voltage regulator matched to your portable power needs to ensure consistent charging and battery health.
Installation, Portability, and Mounting: How to Connect the Battery and Position the Panel
Start by safely connecting the internal GEL battery: remove the battery cover, attach the red cable to the positive (+) terminal and the black cable to the negative (–) terminal, then resecure the cover so the unit remains weatherproof. Next, mount the unit on a steel rod or T-post using the provided bracket; tighten fasteners to prevent rotation in wind. Orient the solar panel for peak panel alignment—tilt and rotate 360 degrees toward true sun path. You’ll carry and reposition the compact unit easily for strip grazing. Check battery connection and alignment after each move to guarantee continuous, shared reliability. Consider adding a portable solar panel to supplement charging when using the unit with backup generators.
Pros, Cons, and Who Should Buy This 10-Mile Solar Charger
While compact and designed for reliable off-grid operation, this 10-mile solar charger delivers a modest 0.16 joule output that’s best suited for short-term, low-resistance fencing and portable strip-grazing setups, not heavy-duty permanent perimeter systems. You’ll appreciate quick mounting, 360-degree panel adjustment, and internal GEL battery management for up to 28 days of operation. Pros: lightweight, easy relocation, low seasonal maintenance, reduced wildlife impact when used as temporary lines. Cons: limited joule output, manual battery connection, not for high-resistance or long-term perimeter control. Buy if you need portable, community-minded fencing for rotational grazing. This charger pairs well with generator-friendly camping gear for those who use portable power or backup power generators.
Some Questions Answered
Does It Include All Necessary Grounding Equipment and Instructions?
Yes — it includes grounding instructions but not a ground rod with the unit, so you’ll need to supply one. You’ll get clear installation tips for proper grounding, including recommended rod depth, spacing and clamp connections. You’ll connect the ground wire to the charger’s terminal, drive the rod into moist soil, and test resistance. You’ll feel supported by the step-by-step guidance to guarantee reliable, safe fence performance.
Is the Unit Waterproof for Year-Round Outdoor Exposure?
Yes — it’s designed with weather proofing and moisture resistance so you can leave it outdoors year-round with confidence. You’ll still want to mount it properly and orient the 360° solar panel for drainage. Periodically inspect seals, cable entry points, and the battery cover (you’ll connect internal leads) after heavy storms or prolonged wet seasons. Following these practical upkeep steps keeps the unit reliable and lets you feel part of a proactive care community.
Can Multiple Units Be Linked for Larger Fence Systems?
Yes — you can run units in parallel operation to cover larger systems, but you shouldn’t directly wire outputs together expecting synchronized output without proper isolation. You’ll get reliable coverage by sectioning the fence and powering each section with its own charger, then synchronizing pulse timing with compatible controllers or using isolation transformers. You’ll feel confident joining neighbors’ setups when you follow grounding, spacing, and manufacturer safety guidelines for consistent, safe performance.
What Is the Warranty Length and Coverage Terms?
The manufacturer warranty is typically 12 months; it covers defects in materials and workmanship but not damage from misuse, lightning, or improper battery connection. For coverage details, you’ll need to register the unit and retain proof of purchase. You’ll also share responsibility for routine maintenance (battery connection, mounting checks). If a covered fault appears, the manufacturer will repair or replace the unit per their warranty terms and shipping policy.
Are Replacement Batteries or Panels Available for Purchase?
Yes — you can buy replacement panels and battery kits. You’ll connect the GEL battery by opening the cover and attaching red to (+) and black to (–). Replacement panels match the charger’s 360° mount and output specs for reliable charging; battery kits include the GEL cell and terminals for safe installation. You’ll get durable components sized for portable strip-grazing setups, and community sellers often offer spare parts and support.